


When positioning your hammock remember that it is very portable and it's worth trying to find a few different places where it can be used. Before hanging it is important to position it correctly in order to achieve a reasonable arc. If the hammock is hung too taught or too slack you will not realise it's full potential.
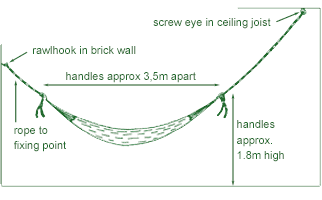
Ideally the hammock handles should be approximately 11ft 6in (3.5m) apart and 6ft (1.8m) high giving the hammock a nice loose curve. Rope should be attached to the hammock handles and the arc continued upto the fixing points.
Remember that you don't need two fixing points exactly 11ft 6in (3.5m) apart as you will be using rope on the handles to extend the arc.
If you're hanging the hammock in a room where the walls are only 8ft (2.4m) apart you can simply offset the fixing points so that the hammock hangs diagonally across the room. It's also worth remembering that the fixing points do not have to be the same height - one could be 11ft (3.3m) high and the other 7ft (2.1m) high for example - just make sure that the handles themselves are at an equal height.
This Space & Rope Calculator should give you a rough idea of how much rope you need according to your particular situation. It can also let you know how high or how far apart your fixing points should be. There are no exact rules for the measurements however and the calculator should only be used as a rough starting guide. You should always arrange the fixings temporarily and check that the hammock arc looks about right before making them permanent.

The easiest way to support your hammock from brickwork, concrete or stone walls is to fix in a 16mm expansion bolt (not suitable for cement block type walls). The most commonly available bolt of this kind is the Rawlhook (M10H) as supplied in our Wall Fixing Kits.
To fix the bolt you will need a power drill (one with a hammer action), a 16mm masonry drill bit and a smaller 4-6mmm masonry bit. If you are drilling into brickwork you should first locate the center of a brick as this will be the strongest point (use a very small drill bit to investigate plastered walls).
Once you've marked your fixing point drill a small pilot hole with the 4-6mm bit then enlarge it with the 16mm bit to accommodate the rawlhook. Ensure that the rawlhook is fully unexpanded, tap it into the hole and turn it until it is tight.
Before using the hammock ease your weight gently onto the unopened weave and bounce a few times (see photo here), then recheck the bolt - it will probably need to be retightened a few times before it is secure.

Supporting your hammock from ceiling joists or any other kind of woodwork is a relatively simple affair. If the woodwork is fully exposed, as with a free floating beam, simply take the rope over the beam a few times and tie a standard hammock knot. Alternatively you can use a welded screw eye (approx. 8mm) as supplied in our Joist Fixing Kits.
To fix an eye just drill a small pilot hole with a 6-7mm drill bit, then screw it into the center of the timber. With ceilings and other locations where the timber is covered by plaster you should first locate the edges of the timber using panel pins or a fine drill bit and then fix the eye in the center. Normal, un-welded screw eyes can be used in place of welded eyes however they will not take as much strain.
If you do find two ideally located trees where you can hang your hammock, just use rope around the trunk or branch and tie a standard hammock knot (see below). With a little imagination, even without trees, it is a simple affair to arrange fixing points. An eye can be attached to anything higher than 6ft (1.8m) that is strong enough to take the weight.
If there's nothing suitable already in place then you can buy a couple of ordinairy 3x3inch (75x75mm) pressure treated fence posts from most garden centers or DIY shops. These posts can be set at an angle and guyed down using large marquee pegs.
Completely free-standing posts which are sunk and concreted into the ground should be at least 4x4inch (100x100mm) and buried 3ft (90cm). You can make supports that are permanent or easily dismantleable as required - all with relative ease.
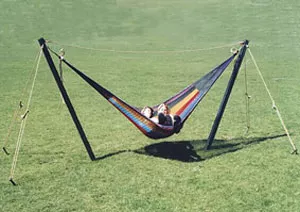
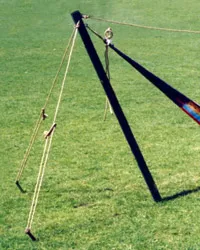
We do have Guyed Post Rigs that are specifically designed for our hammocks. These robust solutions are easy to assemble and provide a good solid support for your hammock. These are the same rigs that we use at all of our outside events and, when installed correctly, they will support 4 or 5 persons.
If you are thinking of purchasing a hammock stand elsewhere please check with us first. Most stands available from DIY stores or other outlets are not suitable as the height of the hanging points and the distance between them is nearly always insufficient to accommodate a real Mexican hammock.
If hammock handles are directly attached to metal fittings damage will quickly occur due to friction whilst the hammock is in use. For this reason short lengths of thick rope (minimum 10mm diameter) should always be used at both ends. It is also important to remember not to just loop the ropes through the hammock handles.
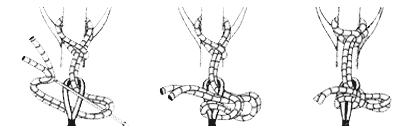
The hammock knot shown here is the ideal hanging method as it prevents nearly all frictional wear to the hammock handle. It is safe, strong and easy to tie. To release the knot you simply pull the loose rope ends and your hammock can be taken down for storage or relocation in a matter of seconds.
Our Wall Fixing Kits and Joist Fixing Kits include weather resistant polyhemp rope.
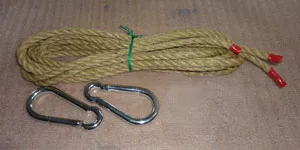
Our Quick Release Kit includes carbine clips for those reluctant to venture into the world of knotology.
Click here to view our hammock fixing kits.
You don't have to be too exact with your measurements when hanging one of our hammocks but you do need to ensure that you have at least 3.5m of clear space. There are a few important points to remember. Always use rope, approx. 10mm or thicker, to connect the hammock handles to your fixing points. This will allow easy height adjustment and, when used in conjunction with the hammock knot shown above, will eliminate frictional wear on the hammock handles. Make sure the hammock is hung in a nice loose arc and don't jump in straight away. Always test the hammock carefully to check the fixings.